- Sinch Community
- Applications
- Sinch Engage
- Chatbot
- Customer properties
- Subscribe to RSS Feed
- Mark as New
- Mark as Read
- Bookmark
- Subscribe
- Printer Friendly Page
- Report Inappropriate Content
Customer properties allow you to gather and store specific information from customer responses. This documentation guides you through the process of adding a new customer property and saving customer responses to it.
🎥 You prefer to watch a quick hands-on tutorial? Check out our new bot builder video tutorial!
👉 Currently, the bot is capable of saving customer properties with the following types: number, word, time, and text. Any customer properties with types not included in this list will not be stored.
Add a New Customer Property
Follow these steps to create a new customer property, for example, to store customer IDs:
- Navigate to the Customers section and select Customer Properties.
- Click the + button at the top right to add a new property.
- Fill in the name, label, and type. For this example, leave values and default values empty.
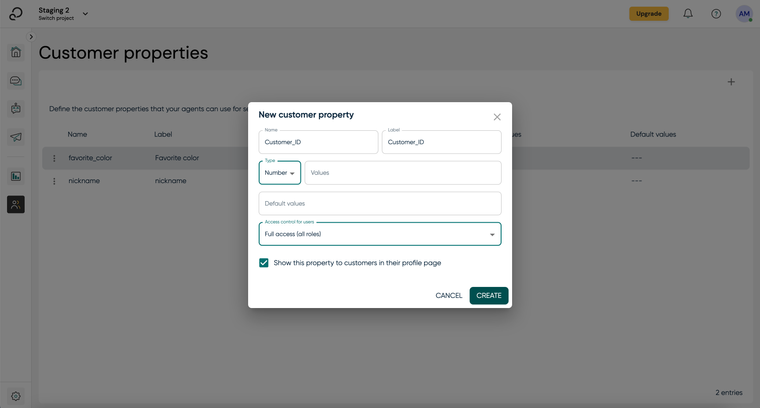
4. Click Create.
Save customer response to customer property
Now, configure the chatbot builder to save customer responses to the created customer property:
- Add a Collect Input block to your chatbot flow.
- Include a text message asking for the customer's information.
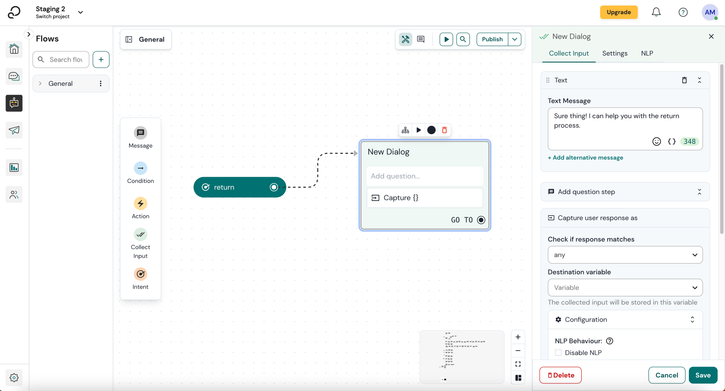
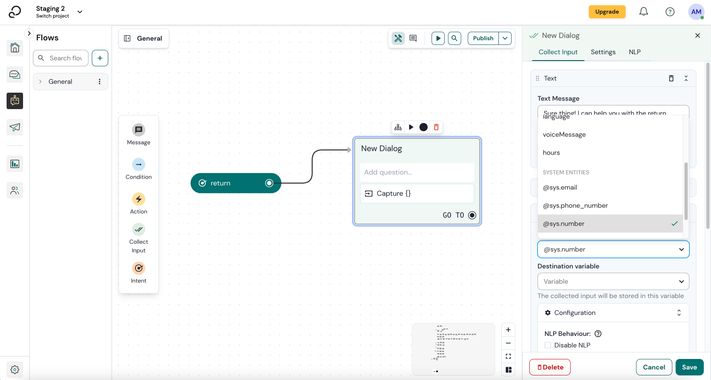
4. Under Destination Variable, select the previously created customer property.
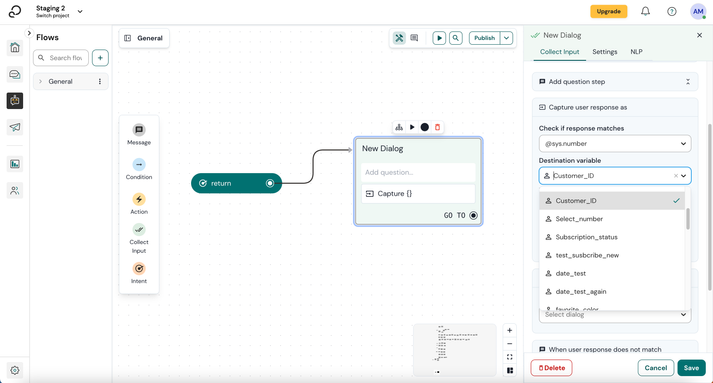
5. Configure the Go-To block to continue the conversation.
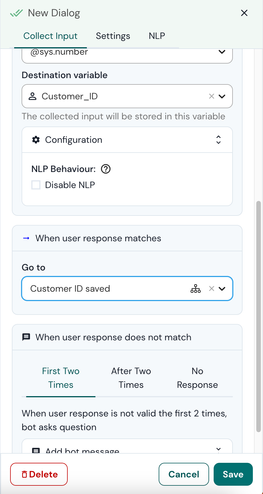
6. Click Save and add a text message for the configured Go-To block.
7. Add text message for the configure go-to block.
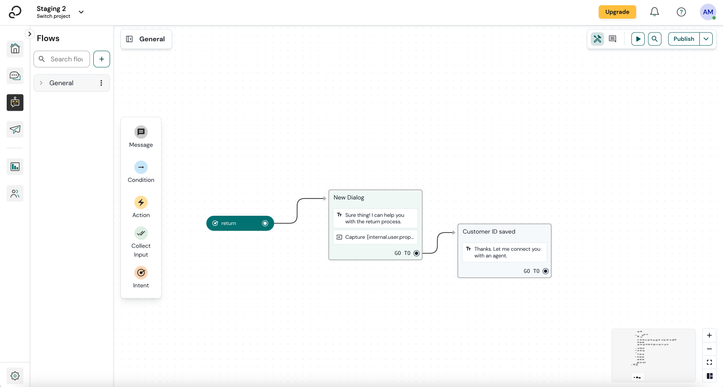
8. Publish your bot to make your changes live.
By following these steps, your chatbot will now collect and store customer IDs in the specified customer property, enhancing the efficiency of your interactions with users.
Use customer property response in bot message
Enhance your bot's interactions by incorporating customer property responses into your messages. Similarly to using variables, this feature allows you to leverage information stored in customer properties to personalize your bot messages.
To use a customer property inside bot message:
- Navigate to the desired block containing the bot message.
- Compose your bot message as usual.
- Insert the customer property response by clicking on ‘{’ within your message. This opens a menu where you can select the customer properties available for use. For instance, if you have saved the user's nickname as a customer property, you can incorporate it into your message for a more personalized touch.
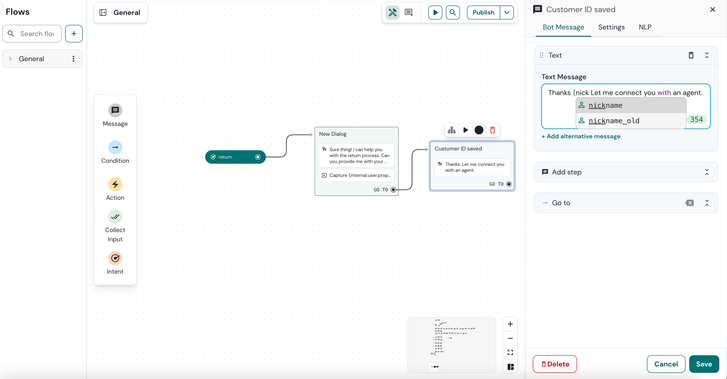
4. Select the correct customer property by identifying it through the associated user icon.
5. Save your changes, and your bot message will now dynamically incorporate the customer property response during interactions.
Use customer properties with buttons
To use customer properties with buttons, you will need to:
- Create a Conditions block as a Go To after each button.
- Open one of these blocks.
- In the Else option click on + Add variable of type Text.
- In the following field, add the internal value of the variable using this format: internal.user.properties.Department_1703155477054 and add the value of the button in the third field, like the image below:

Nice to know
If you have a customer property and a variable with the same name, this is how you can distinguish them: customer properties are shown with an avatar icon, while variables have the curly brackets icon {}.


Working with previously created customer properties and/or customer properties updated with a CSV
If you are working with csv files to batch update the customer properties, it will also not work for now. Using customer properties in the bot flow works when they are added/updated through the chatbot conversation.

For these types of customer properties, the indicated way is to make an API call (read more here) to
https://rest.messengerpeople.com/docs/v17/#method-5b6ea1729c24ea6c90055e6e359b42e4

As you can see from the image above, you can make a GET request to the endpoint: https://rest.messengerpeople.com/api/v17/user/property informing the user id, which is variable for every conversation and is saved under profile.messenger_id and you need to inform a value, which should be a string. The result of this API call will be saved under the variable that is called apiResult, in this example. Don't forget to put your API key in the Authorization tab 😉.
Once a succesfull reqeust is made, this is what the apiResult will look like:
 "apiResult": {
        "data": {
            "property": {
                "id": 117533,
                "channel_id": 72165,
                "name": "City",
                "expiration": -1,
                "label": "City",
                "default_value": "---",
                "position": 4,
                "type": "word",
                "values": "",
                "hidden": 0,
                "agent_visible": 1,
                "user_visible": 1
            },
            "user_values": [
                {
                    "id": 999001212140221,
                    "value": "Berlin",
                    "last_update": 1703864511
                }
            ]
        },
So, in order to show the customer property you need, this is the syntax you need to use:
{apiResult.data.user_values[0].value}
This is how it will look like in the conversation:
See also:
- Mark as New
- Bookmark
- Subscribe
- Mute
- Subscribe to RSS Feed
- Permalink
- Report Inappropriate Content

