- Sinch Community
- More topics
- Engage Classic
- Chatbot
- Create your FAQ flow with a generative knowledge base AI
- Subscribe to RSS Feed
- Mark as New
- Mark as Read
- Bookmark
- Subscribe
- Printer Friendly Page
- Report Inappropriate Content
In this article, you'll learn how to select then add content to create your generative knowledge base. This happens in 3 steps:
- Select relevant content
- Add content
- Build a flow
Select relevant content
In order to get the best possible results from your knowledge base AI, it's important to keep a few guidelines in mind when selecting content:
- Only include data that is relevant to the questions from users. If you have a PDF with 100 pages, of which only 1 is relevant for customers, extract that page, and upload it separately.
- In PDFs and URLs, complicated layouts might decrease the quality of the results
- The knowledge base AI isn't good at understanding data from a table. Don't use knowledge base to upload database files.
- Currently, knowledge base AI isn't able to process any images, video's or other media types
- Currently, if your website requires JavaScript to be loaded, it can't be read by the knowledge base
- If the URL has scraping protection activated, such as Incapsula, the webpage won't be able to be added to your knowledge base AI
Now, you know better what content your bot would scrape. Let's see how to add it to your bot.
Add content
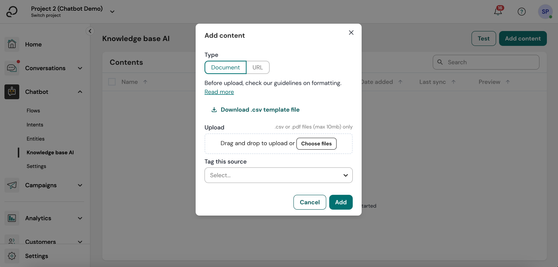
Now that you selected relevant content, your bot needs to access your content. To do this, you need to add content to your bot which will constitute your knowledge base.
To add content to your bot:
- Navigate to the Knowledge base AI section inside of your bot.
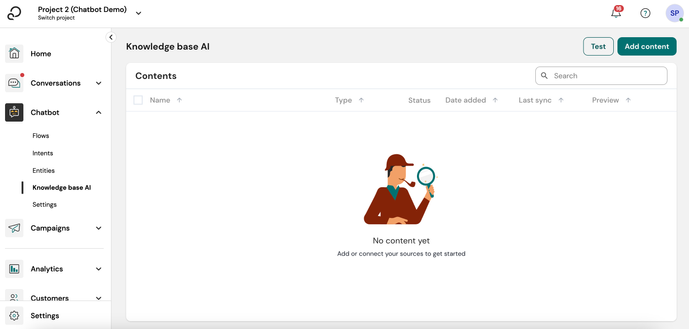
There are 2 types of content you can add:
- Documents, uploaded from your computer. These can be:
- CSV files: are the only ones supported for non-generative knowledge bases, using a specific format.
- PDF files: e.g. product descriptions, FAQ documents, training documentation, etc.
- URLs from publicly available websites. There are two options when you add URLs:
- Only this page: only use the exact page that the URL links to.
- Entire domain: use the page the URL links to and all linked pages.
3. Add your content.
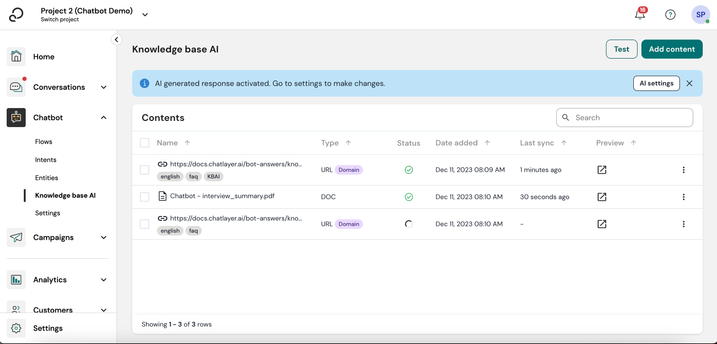
4. Once it's done, the content will show up in the Contents table. This table shows the name of your content, its type, its status, when it was added and when it was last synced.
5. Repeat this until you've added all the content that you would like your bot to know.
6. If you click on the three dots at the end of the row, you can:
- Open your URL in a new tab (or preview your document if the content fits this type) .
- Sync our URL (i.e. update it with the latest changes).
- Delete your content.
Now, your knowledge base displays your content and is ready to be used inside conversations. Let's see how to build a flow that displays the answer.
Build a knowledge base flow
Once your bot has access to all relevant content, it's time to build a flow where your bot will know when to browse this knowledge base to provide an answer to your customer's question.
If you want to create a new chatbot, please watch the video:
Making a knowledge base flow will happen in 2 steps:
- Retrieve the answer
- Display the answer
Retrieve the answer
The flow step to retrieve a response based on the knowledge base will happen inside an Action bot block.
To retrieve an answer from the knowledge base:
- There are 2 ways that you might want to use your knowledge base. Either:
- In your Not Understood block, as a fallback option. To do this, go to your Not Understood block, change its block type to Action, and continue by following from step 2.
- Anywhere in your flow. To do so, drop an Action block in your canvas. For this example, we will name this block "Generate answer".
- Click on Knowledge base AI.
- Fill in the fields accordingly. You can configure:
- Variable: the answer from the knowledge base will be stored as a variable. In the first field, you can choose the name of that variable.
- No results: if the question that the user asks cannot be answered by the knowledge base AI, a block will be triggered. You can select which block in this dropdown.
- Failure: if there is a problem with the knowledge base AI, and it returns an error, you can select a block which the user will be led to. By default, users will be routed to the Error Occurred block.
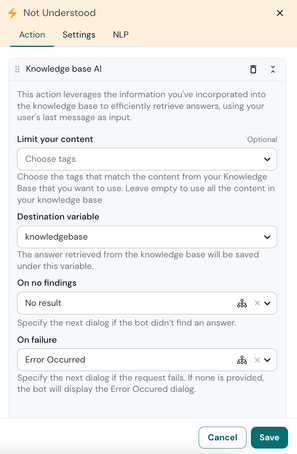
4. Save your changes
Display the answer
To display the answer from the knowledge base:
- Open the Action block that generates your knowledge base answer.
- At the bottom of the block, add a Go To that goes to a block that you can create from within the dropdown. In this example, we will call this block "KB result".
- Save your changes
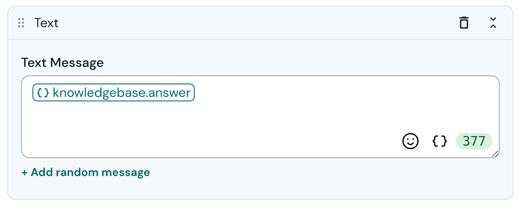
- Open the newly created KB result block
- Add a text message that contains the variable you chose to save the knowledge base AI answer into. By default, this is {knowledgebase.answer}.
- Save your changes
All done! Your knowledge base AI bot is now ready to be used 👏
How to link to the URL of your source in the bot answer
When your bot retrieves an answer from your knowledge base, this answer exists within a variable that also contains a link to the source of this answer. This source is either a PDF name or link to an URL.
In the case of an URL source, this URL link can typically be used as a button within the bot conversation.
Please remember that non-generative knowledge bases can only use .csv files.
Find your knowledge base session data
To find your knowledge base session data:
- Create your knowledge base using a URL as content.
- Build your knowledge base AI flow as explained above.
- Test your bot by asking something for which the bot can retrieve a result.
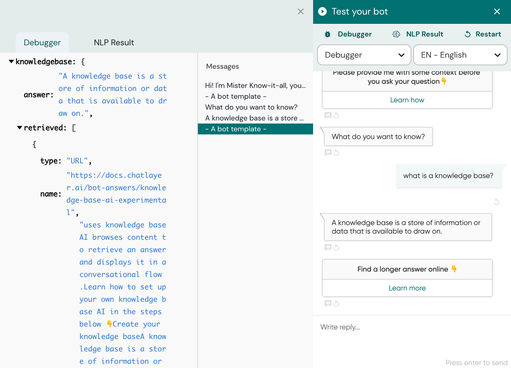
- In the Test your bot window, click on the Debugger button.
- Scroll down the Debugger tab until you find the session data called knowledgebase.
The knowledgebase object contains a few fields:
- answer: the answer that can be used in a text message in your bot
- retrieved: an array of all the content that was used to formulate the answer. For each array item, the following data is stored:
- type: type of the source: "URL" or "DOC"
- name: filename of the document or link of the URL
- content: snippet of the content that was used to generate the answer.
Display the knowledge base content URL in a button
You can use the URL of a knowledge base answer in a button, so that the user can learn more about a specific answer.
To use the knowledge base URL within an answer:
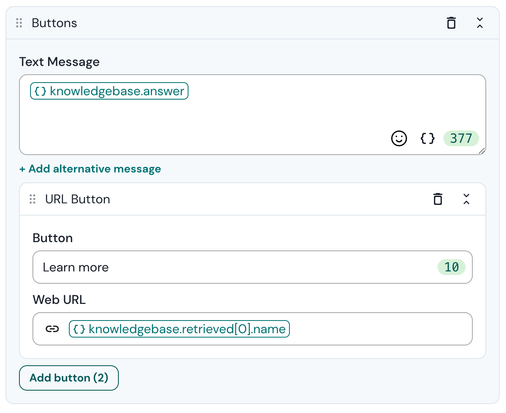
- Create your text message.
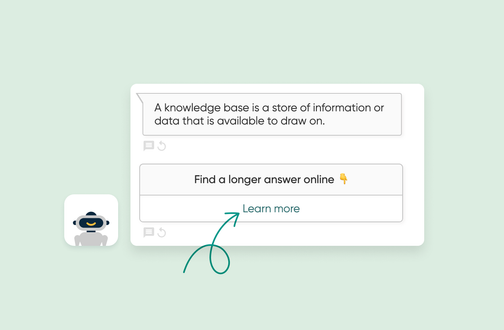
- Add a button that displays the following variable: knowledgebase.retrieved[0].name. In this variable, name means that we're capturing the URL, [0] means that we're doing this for the first item of the retrieved array. Your bot message should look similar to this one:
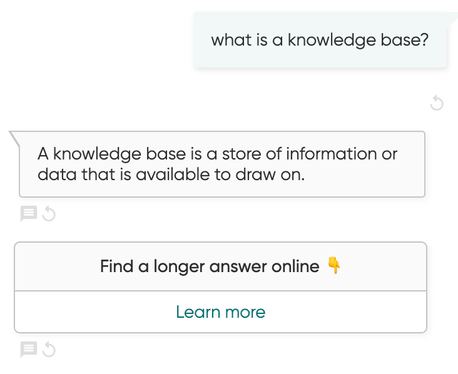
Your final result should be similar to this:
See also:
Introduction to Knowledge base AI
- Mark as New
- Bookmark
- Subscribe
- Mute
- Subscribe to RSS Feed
- Permalink
- Report Inappropriate Content
